After the 4 fundamental adjustments you make to your ultrasound image (depth, focus, frequency and gain), there is another control which can potentially change your image quite dramatically and very quickly. It’s called Dynamic Range (DR). OK, so a little bit of theory. Ultrasound, as the name suggests, utilises sound which is converted by the scanner to build your image and we know that different structures within the body will attenuate the sound waves and signal strengths differently. This is how we can tell the differences between different tissues, structures and organs. Sometimes, however, the difference between structures or tissues might just be too subtle and we need to add a little bit of contrast to an image to make things appear more obvious. This is where Dynamic Range can help us.
Dynamic Range is measured in Decibels – it’s sound after all, and on the screen of your scanner somewhere in the image information display you should find a reading marked dB, that’s the one we’re looking at. However, some of the Chinese systems will just measure as a number, but there will be a control on your system marked ‘Dynamic Range’, on some Philips systems, it’s called ‘Compress’.
OK, here’s the basic rule of thumb:
• Higher Dynamic Range = more shades of grey = softer image
• Lower Dynamic Range = less shades of grey = more contrasty image, which looks ‘sharper’
Turning the DR down will make your image more contrasty and turning it up will have the opposite effect, the image will get softer. As part of the presets on your scanner the DR setting should be in the rough area for the scan, but a little bit of optimisation will help you, it’s all a personal preference. For example, if you are scanning an abdomen and have a quick look at a kidney, turning the DR down will improve the image of the kidney and its internal architecture will start to be more obvious. Just remember to bring the DR back up slightly as you go back into the general abdomen. A lower DR can also help differentiate the layers in a GI tract image. Please remember to keep making other adjustments after changing the DR to optimise the image, such as overall gain.
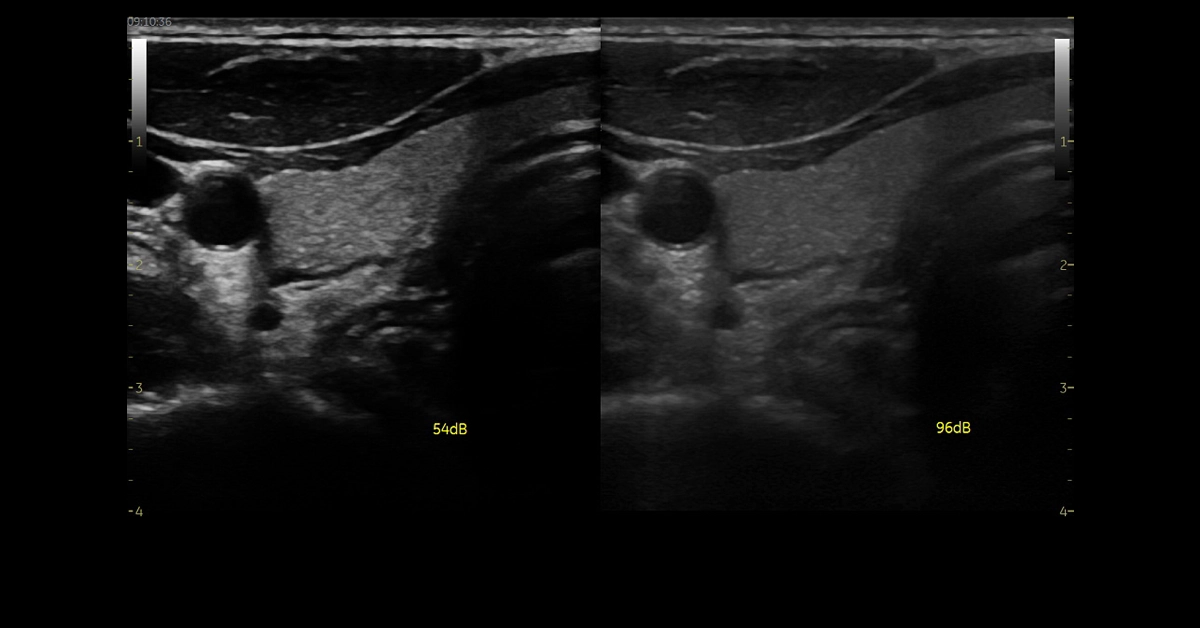
You will see in the example, the image on the left is very ‘contrasty’ and the vascular structures are clearer. This has a DR setting of 54dB. The image on the right is ‘softer’ with a DR of 96dB and is potentially better for the soft tissue, but your do need to be careful not to increase the DR too much or the image starts to look vague and ‘washed out’.
Generally, for cardiology scans, the default setting for DR will be lower than in an abdominal scan as you require a more black and white ‘contrasty’ image. You are normally more interested in functionality of the heart rather than tissue structure and a lower DR can make definition of valves, chambers etc. more obvious making measurements easier and potentially more accurate. But please do alter the DR and see if a different setting works better for you.
If you have any questions about any of the controls or settings on your scanner, how to optimise the image or even if you are looking for advice on the purchase of additional probes to increase the flexibility of your system, please get in touch. Drop me an email at info@ultrasoundscannertraining.co.uk or call me on 07795322354, I’m always happy to chat and answer your questions.